Magnificent Chocolate Bar Mega Cake Recipe
This is Chocolate Cake in its truest form!
Please scroll down below to see the full printable recipe for this delicious dessert recipe!
Magnificent Chocolate Mega Bar Cake

Baking the Cake:
- 10 lbs Yo’s Ultimate Chocolate Cake
- Americolor Teal Food Gel
- Americolor Turquoise Food Gel
Icing The Cake:
- 4 x Simple Syrup
- 3 x Yo’s Chocolate Buttercream
- Jar of Nutella
Covering The Cake:
- 5 x Tim Tams (12 pack)
- 10 x Kit Kat Bars
- 8 x Ferrero Rocher Chocolate (16 pack)
- 6 x Butterfingers Fun Size Bars (12 pack)
- Gold Luster Dust
- 1.5 lbs Fondant
- Americolor Teal Food Gel
- Americolor Turquoise Food Gel
- Royal Icing
-
Bake Chocolate Cakes
Prepare your 10 lbs of Ultimate Chocolate Cake batter and divide accordingly:
2.5 lbs of batter in 12” Round Cake Pan (40 mins)
3.5 lbs in 9” Round Cake Pan (1 hr 10 mins)
1.5 lbs in each 6” Round Cake Pans (40 mins)
1 lbs in 5” Round Cake Pan (35 mins)
- Bake at 350 degrees for the given time in brackets above, or until a toothpick comes out clean. Cool cakes completely in their pans sitting on a wire rack.
Bake Vanilla Cakes
-
Prepare your 10 lbs of Ultimate Vanilla Cake batter. Once prepared, mix in some of your Americolor Teal Food Gel and Americolor Turquoise Food Gel until you get a teal colour you like and then divide accordingly:
3 lbs of batter in 12” Round Cake Pan (40 mins)
3.5 lbs in 9” Round Cake Pan (1 hr 10 mins)
1.5 lbs in 6” Round Cake Pan (40 mins)
1 lbs in 5” Round Cake Pan (35 mins)
-
Bake at 350 degrees for the given time in brackets above, or until a toothpick comes out clean. Cool cakes completely in their pans sitting on a wire rack.
Prepare Chocolate Buttercream
-
Prepare your Chocolate ButtercreamIt’s Simple! . If you have a StayBowlizer, this is a great place to use one to keep your bowl in place while you mix!
It’s Simple!
-
Prepare one recipe of simple syrup, and allow to cool completely before pouring into a simple syrup squeeze bottle.
Level Cakes
-
Once your cakes are completely cool, remove them from their pans and level with a ruler and serrated knife. Because each of your cakes are baked at different levels, make sure to level the same size cakes to the same height. I also made sure to cut the following cake layers in half:
Vanilla & Chocolate 9” round cakes, cut in half
Vanilla & Chocolate 6” round cakes, cut in half
Vanilla 5” round cake, cut in half
Leave the rest of your cake layers leveled only.
-
Shower With Simple Syrup
Lay out your chocolate and teal vanilla cake rounds on a flat surface and sprinkle thoroughly with simple syrup. Allow to soak in completely prior to decorating.
Assemble Your Tim Tam Bottom Tier
-
Place your first chocolate cake layer down on your 12” cake board. Chop up some Tim Tams, which will be used for the filling in between cake layers. Spread a bit of chocolate buttercream on top of your cake using your large offset spatula, sprinkle on your Tim Tams and then spread some more buttercream on top to level out the layer and fill out any gaps. Then layer your vanilla cake on top. Set aside.
Assemble Your Butterfinger 2nd Tier
-
Place your first chocolate layer down on your 9” cake board. Chop up some Butterfingers, which will be used for the filling in between each of these cake layers. Spread a bit of chocolate buttercream on top of your cake using your large offset spatula, sprinkle on your Butterfingers and then spread some more buttercream on top. Layer your first vanilla layer on top, then repeat the chocolate buttercream and Butterfingers process, repeating a third and fourth time with your remaining chocolate and vanilla cakes. Set aside.
Assemble Your Ferrero Rocher 3rd Tier
-
Place your first chocolate layer down on your 6” cake board. Chop up some Ferrero Rocher chocolates, which will be used for the filling in between this tier. Fit the #805 piping tip into a piping bag and fill with some chocolate buttercream. Pipe a ring around the outer rim of this cake layer before spreading your Nutella in the centre using your small offset spatula, then sprinkle some Ferrero Rocher over top of the Nutella. Layer your first vanilla layer on top, then repeat piping the chocolate buttercream ring, spreading the Nutella and sprinkling your Ferrero Rocher pieces, repeating a third and fourth time with your remaining chocolate and vanilla cakes, alternating as you go.
-
Note: You will be left with one chocolate layer. Use this layer to indulge a little and take the time to taste your cakes! Spread a bit of chocolate buttercream and sprinkle on your favourite chocolate and enjoy. You’ve earned it!
Assemble Your Kit Kat Top Tier
-
Place your chocolate layer down on your 5” cake board. Chop up some Kit Kats, which will be used for the filling in between this tier. Spread a bit of chocolate buttercream on top of your cake using your small offset spatula, sprinkle on your Kit Kats and spread some more buttercream on top. Then, layer your final vanilla cake on top. Set aside.
Crumb Coat & Chill
-
Once all of your tiers are fully stacked, crumb coat each tier in chocolate buttercream and let chill in the fridge for 20 minutes.
Ice & Chill
-
Retrieve your cakes from the fridge and ice again with more chocolate buttercream, using an icing spatula and a bench scraper to get the edges nice and smooth. Return to fridge for a final 20-minute chill.
Dye Your Fondant
-
Dye your fondant using a mix of Americolor Teal Food Gel & Americolor Turquoise Food Gel. Once colour is fully incorporated, roll the fondant into a ball and set aside.
-
Note: If you prefer to do this a day in advance, be sure to cover the fondant tightly with plastic wrap and store in a cool, dry place.
Add A Pop Of Color
-
To make this cake a little more glamorous, I wanted to add a pop of teal fondant to the tops of each cake tier. To do this, roll out your teal fondant into circles that are a bit bigger than the circumference of each cake. Using each of your cake pans as a template, lay your 12” pan upside down on top of your largest fondant circle and cut around the pan with your paring knife. Carefully pick up the fondant and lay on top of your 12” round cake. Repeat this process with the rest of your cakes.
Dowel Your Bottom Cake Tier
-
Using a ruler, find the centre of your bottom cake tier and make a mark in the fondant with a wooden dowel. Place your 9” cake pan centered on top of your 12” cake and lightly mark a circle around your cake with the tip of your knife. Your dowels should be placed about 1 ½” within this circle, all around. Poke your first dowel down into your cake and make a mark on the dowel that is flush with the top of the cake. Now, remove the dowel and use it to mark the height that all the dowels need to be for this tier. Cut 16 pieces of your wooden dowels to this height before placing into your cake in a circular fashion. There should be 12 dowels around the outside ring and 4 in a square or diamond shape the middle.
Dowel Your 2nd Cake Tier
-
Dab a bit of royal Icing in the middle of your cake with an offset spatula and lay your 9” cake board (and cake!) on top. Repeat the above steps to dowel this layer by finding the centre of your cake tier and making a mark in the fondant. Place your 6” cake pan centered on top of your 9” cake and lightly mark a circle around your cake. Again, your dowels should be placed about 1 ½” within this circle, all around. Use the same method as above to determine the height that your dowels need to be. Mark this height and cut 8 pieces of your wooden dowels to this height before placing into your cake in a circular fashion. Dab with a bit of royal icing and place your 6” cake on top of your 9” cake.
Dowel Your 3rd Cake Tier
-
Repeat the process above. Place your 5” cake pan centered on top of your 6” cake and lightly mark a circle around your cake. Mark this height and cut 6 pieces of your wooden dowels to this height before placing into your cake in a circular fashion. Dab with royal icing and finally, lay your smallest cake tier on top.
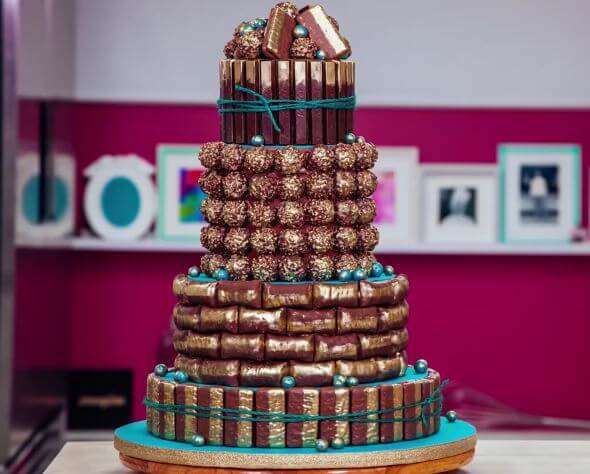
All That Glitters Is Gold
-
Once it’s all assembled, it’s time to decorate!! Have some fun adding gold luster dust to your chocolate bars using a small paint brush. I painted a different pattern on each type of chocolate bar, so feel free to get creative!
Decorate Around Each Layer
-
Using your small offset spatula, place little pats of buttercream as you place each chocolate bar around your cake layer. I decorated each layer accordingly:
Tim Tams Bottom Tier – vertical fence pattern
Butterfingers 2nd Tier – horizontal brick pattern
Ferrero Rocher 3rd Tier – arranged in even rows all over
Kit Kat Top Tier – vertical fence pattern
Add A Bit Of Ribbon
-
To help the Tim Tam & Kit Kat layers stay in place, I used some pretty ribbon and twine in the same teal colour of the fondant to hold the layers together, wrapping each around the circumference of the cake a couple of times and tying tightly in place.
Decorate The Top
-
To add the finishing touches to this showstopper, decorate the top tier with an assortment of your remaining gold-painted chocolate bars!
-
Serve and Enjoy!!!
Recipe from:howtocakeit.com
