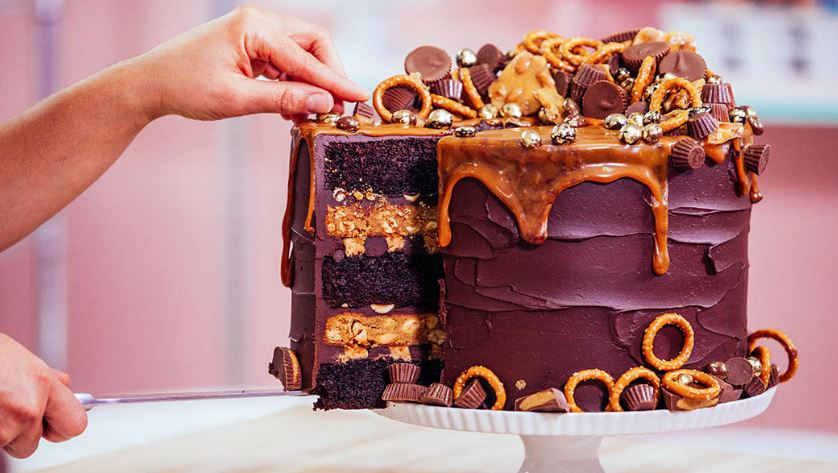
Superb Chocolate Peanut Butter Mega Cake Recipe
This Chocolate Peanut Butter Cake is truly mega…in size and in taste! It’s superbly delicious!
Please scroll down below to see the full printable recipe for this delicious dessert recipe!
Superb Chocolate Peanut Butter Mega Cake Recipe
Baking the Cake:
- 8 lbs Yo’s Ultimate Chocolate Cake
Icing The Cake:
- Simple Syrup
- Dark Chocolate Ganache ((4x recipe))
- Peanut Butter Frosting
- Peanut Butter Blondies ((2x recipe))
- 1 cup Salted Roasted Peanuts
Quick Caramel
- Pretzel Rings ((or your favourite shape of pretzel))
- Peanut Butter Cups
- Mini Peanut Butter Cups
- Peanut Brittle
- Milk Chocolate Covered Peanuts
- Dark Chocolate Covered Peanuts
- Gold Luster Dust
- Clear Food Grade Alcohol
-
Bake Cakes
Prepare your Ultimate Chocolate Cake batter and divide evenly between three of your prepared 9” cake pans. Bake at 350º for 55 minutes or until a toothpick comes out clean. Cool cakes completely in their pans sitting on a wire rack.
-
Bake Blondies
Prepare your Peanut Butter Blondies. Divide batter evenly between the remaining two 9” round cake pans. Bake at 350º for 25- 30 minutes or until a toothpick comes out clean. Cool blondies completely in their pans sitting on a wire rack.
-
Prepare Frosting
Prepare your Peanut Butter Frosting. If you have a StayBowlizer, this is a great place to use one to keep your bowl in place while you mix!
-
Get Your Ganache Ready
Prepare 4x the recipe of Yo’s Dark Chocolate Ganache. Allow to set.
-
It’s Simple!
Prepare one recipe of Simple Syrup, and allow to cool completely before pouring into a simple syrup squeeze bottle.
-
Level Cakes
Remove cakes from their pans. Once your cakes are completely cool, remove them from their pans and level with a ruler and serrated knife.
-
Shower With Simple Syrup
Lay out your three chocolate cake rounds on a flat surface and sprinkle with simple syrup. Allow to soak in completely prior to decorating.
-
Cool Your Blondies
Remove your peanut butter blondies from their pans. Allow to cool completely.
-
Assemble Your Chocolate Layer
Start with one round of chocolate cake on the bottom. Using a piping bag, pipe alternating rings of chocolate ganache and peanut butter frosting on top of this layer, beginning from the outside of the cake and continuing in a bullseye pattern until you reach the centre.
-
Assemble Your Blondie Layer
Place one of your peanut butter blondies on top of your first chocolate cake layer and spread a generous amount of ganache on top with your regular offset spatula. Sprinkle on some salted roasted peanuts.
-
Repeat That Chocolate Peanut Butter-y Goodness
Repeat this assembly with another layer of chocolate cake. Pipe your alternating rings of peanut butter frosting and chocolate ganache, again starting from the outside until it reaches the centre. Layer on your second blondie. Spread your ganache over the blondie, sprinkle on some more salted roasted peanuts and – finally, place that last layer of chocolate cake on top.
-
Crumb Coat & Chill
Once fully stacked, crumb coat the entire cake in chocolate ganache and let chill in the fridge for 20 minutes.
-
Ice & Chill
Retrieve your cake from the fridge and ice again with the rest of the chocolate ganache. Return to fridge for a final 20-minute chill.
-
Quick! Prepare Your Caramel
Make Quick Caramel and let cool. Pour into centre of top of cake and, using your small offset spatula, push over the sides so the caramel drips over the edge of the cake naturally.
Note: The caramel does tend to cool really quickly when spread over the chilled cake, so you have to be fast. If you have one, you can use a blowtorch to reheat the caramel on your cake.
-
Glam Up Your Peanuts
Dress those peanuts up a little by mixing your gold luster dust and clear food grade alcohol in a bowl. Once it looks like a shimmery paint, place your dark chocolate and milk chocolate-covered peanuts in the bowl and swirl around the bowl until they create a fun golden pattern.
Note: Make sure not to coat the chocolate-covered peanuts completely! They should just have a nice gold swirl.
-
Get A Little Nutty
This is the fun part! Using your pretzel rings, mini and regular peanut butter cups and peanut brittle, decorate the top and sides of your cake any way you’d like! Add any finishing touches with your golden-dipped chocolate-covered peanuts.
-
Serve and Enjoy!
Recipe from: howtocakeit.com
